Red Velvet Cake Mix Blossom Cookies topped with chocolate Kisses, garnished with red sugar.

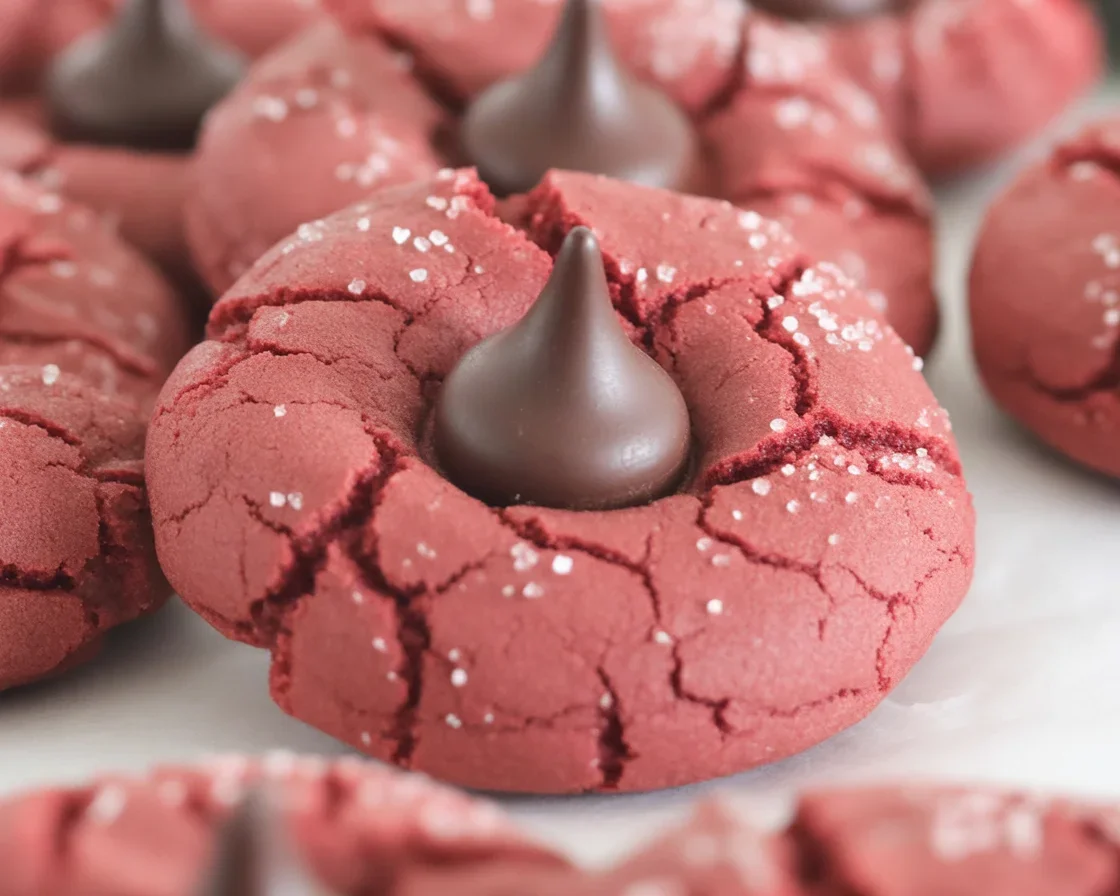
Red Velvet Cake Mix Blossom Cookies You’ll Want to Bake Today

Red Velvet Cake Mix Blossom Cookies saved me last holiday when I needed a dessert in under 30 minutes. You know those moments when you promised to bring something sweet, and time just sprinted away from you? Been there. These cookies are soft, chewy, and dressed up with a chocolate kiss in the center, which makes them look extra special without any fuss. If you love simple baking wins, this recipe is about to become your go-to. Let me walk you through exactly how to pull it off, with plenty of helpful tips and little ways to make them your own.

Why you need to make Red Velvet Cake Mix Blossom Cookies!

If you’ve got a box of cake mix and a bag of chocolate kisses, you’re almost done already. That’s the magic here. The dough mixes up fast, rolls easily, and bakes into cookies that taste bakery-level without all the stress. The red velvet flavor brings cocoa notes and that pretty color, and the chocolate kiss on top seals the deal. You can even freeze the dough balls for later, so fresh cookies are always minutes away.

Here’s my favorite part. These cookies are generous without being high maintenance. They travel well, they look festive on a plate, and they’re just as good on a random Tuesday as they are at a party. I’ve made them for bake sales, for neighbors, and for those nights when the craving hits after dinner. Every time, they disappear fast.

“I made these for a birthday dinner and got five texts asking for the recipe before the night was over. My teen helped and felt like a baking pro.”

If you’re new to baking, you’ll love the confidence boost. If you’re experienced, you’ll love shaving time off your to-do list without sacrificing the wow factor. And yes, they taste as good as they look.

Recipe Variations

You can absolutely keep it classic, but a few small tweaks make these cookies feel brand-new each time. Try swapping the chocolate kisses with hugs or caramel-filled chocolates for a gooey center. If Valentine’s Day is coming, use the heart-shaped chocolates and call it done. A sprinkle of red, pink, or gold sanding sugar on the outside turns them party-ready without adding work.

Want extra chocolate? Stir in a small handful of mini chips to the dough before baking. Feeling fancy? Press a square of dark chocolate into the center instead of a kiss. If you love cream cheese frosting, pipe a tiny swirl over the top after the cookies cool and dust with a whisper of cocoa. I’ve also rolled the dough balls in powdered sugar for a crinkle effect. It’s pretty and gives a soft little sweetness around the edges.

If you’re baking for someone who prefers less chocolate, skip the candy and place a raspberry on top right after baking. The heat softens it slightly and the flavor with red velvet is lovely. For birthdays, add colorful sprinkles into the dough to give it a funfetti look with that red velvet base. It’s a playful twist that kids love.

Expert Tips

Chill is your friend. Pop the unwrapped chocolates into the freezer before you start. When you press a cold kiss into a warm cookie, it holds its shape instead of melting into a puddle. It’s a tiny step that makes your cookies look picture-perfect.

Use parchment. It keeps the bottoms from browning too fast, and clean up is a breeze. If you have silicone mats, those work too. I like parchment for the slightly crisper bottom it gives.

Measure oil and eggs correctly. Cake mix cookies are forgiving, but the texture depends on balance. Stick to 2 large eggs and about 1/2 cup oil. If your mix is the standard 15.25 ounce box, that ratio gives a soft yet scoopable dough. If your dough feels too sticky, rest it for 5 minutes or chill it for 10.

Roll in sugar. A quick roll in granulated sugar adds sparkle and helps the exterior set into that classic crinkle. It also makes the dough less sticky in your hands.

Don’t overbake. Pull them when the edges are set and the tops look slightly puffed with soft cracks. They’ll finish cooking on the sheet. Usually 8 to 10 minutes at 350°F is the sweet spot for me.

Let them set. After pressing the chocolate on top, leave the cookies on the sheet for about 5 minutes, then move them gently to a rack. The kiss will firm up as they cool.

How to make Easy Red Velvet Cake Mix Blossom Cookies

Ingredients

  • 1 box red velvet cake mix, about 15.25 ounces
  • 2 large eggs, room temperature
  • 1/2 cup vegetable oil or melted butter, slightly cooled
  • About 24 to 30 chocolate kisses, unwrapped and frozen for best results
  • 1/3 cup granulated sugar, for rolling
  • Optional: 1 teaspoon vanilla extract or 1/2 teaspoon almond extract

Directions

  • Heat the oven to 350°F. Line two baking sheets with parchment.
  • In a medium bowl, stir the cake mix, eggs, oil, and vanilla until the dough is thick and even. It should be soft but not runny.
  • Use a small cookie scoop or spoon to portion dough into 1 tablespoon balls. Roll each ball in granulated sugar.
  • Place the balls 2 inches apart on the baking sheets.
  • Bake for 8 to 10 minutes, until set at the edges. The tops will look slightly crackly and puffy.
  • Remove the sheet from the oven and immediately press one frozen chocolate kiss into the center of each cookie.
  • Let the cookies sit on the sheet for 5 minutes, then transfer to a wire rack to cool completely so the chocolate firms up.
  • Yield is about 24 cookies, depending on scoop size.

That’s it. Simple, satisfying, and pretty much impossible to mess up. If you want extra drama, dust a little powdered sugar over cooled cookies for a snowy finish. For holiday cookie boxes, tuck parchment squares between layers so the kisses stay neat.

Storage and Freezing

Freezer tips

  • Room temperature: Keep cookies in an airtight container for 4 to 5 days. They stay soft if you add a slice of sandwich bread to the container. Replace the bread as it dries out.
  • Fridge: Not needed for baked cookies. If your kitchen is hot, a short chill can help the chocolate hold its shape, but room temp is best for texture.
  • Freeze baked cookies: Arrange in a single layer on a tray, freeze until firm, then store in a freezer bag for up to 2 months. Thaw at room temp.
  • Freeze dough balls: Roll the dough balls in sugar and freeze on a baking sheet. Transfer to a bag once solid. Bake from frozen at 350°F, adding 1 to 2 minutes. Press on frozen kisses right after baking.
  • Make ahead: Mix the dough up to 24 hours in advance and chill. Let it sit at room temp for 10 minutes before scooping if it feels too firm.

Common Questions for Red Velvet Cake Mix Blossom Cookies

Can I use butter instead of oil? Yes. Use 1/2 cup melted and slightly cooled butter. The cookies will be a bit richer and slightly thicker.

My kisses melted. What went wrong? Most likely they were room temp and the cookies were too hot. Freeze the kisses first and press them in quickly. Let cookies rest on the sheet so the chocolate sets without smearing.

Do I need to chill the dough? Not always. If the dough is sticky or your kitchen is warm, a short 10 to 15 minute chill helps with rolling and clean edges.

What size cake mix works best? A standard 15.25 ounce box is ideal. If your box is larger, start with 1/3 cup oil and add a drizzle more only if the dough is dry.

Can I make them gluten free? Yes. Use a gluten free Red Velvet Cake Mix Blossom Cookies and check that your chocolates are gluten free. The method is the same.

Ready to bake a batch you’ll brag about

Now you’ve got everything you need to make Red Velvet Cake Mix Blossom Cookies that look impressive and taste even better. The method is simple, the ingredients are basic, and the payoff is huge. Try a classic batch first, then have fun with fillings and toppings once you’re hooked. I can’t wait for you to take a bite while that chocolate is still soft and the cookie is warm. When you do, come back and tell me how fast they disappeared.

Red Velvet Cake Mix Blossom Cookies topped with chocolate Kisses, garnished with red sugar.

Red Velvet Cake Mix Blossom Cookies

Deliciously soft and chewy cookies made with red velvet cake mix and topped with a chocolate kiss, perfect for any occasion.
Prep Time 10 minutes
Cook Time 10 minutes
Total Time 20 minutes
Servings: 24 cookies
Course: Dessert, Snack
Cuisine: American
Calories: 100

Ingredients
  

Cookie ingredients
  • 1 box red velvet cake mix, about 15.25 ounces Standard size
  • 2 large eggs, room temperature
  • 1/2 cup vegetable oil or melted butter, slightly cooled For richer flavor, use butter.
  • 24 to 30 pieces chocolate kisses, unwrapped and frozen for best results Use frozen kisses to prevent melting.
  • 1/3 cup granulated sugar, for rolling
  • 1 teaspoon vanilla extract or 1/2 teaspoon almond extract Optional for added flavor.

Method
 

Preparation
  1. Preheat the oven to 350°F (175°C) and line two baking sheets with parchment paper.
  2. In a medium bowl, mix the cake mix, eggs, oil, and vanilla until the dough is thick and even.
  3. Use a small cookie scoop or spoon to portion the dough into 1 tablespoon balls and roll each ball in granulated sugar.
  4. Place the dough balls 2 inches apart on the prepared baking sheets.
Baking
  1. Bake for 8 to 10 minutes, or until the edges are set and the tops appear slightly crackly and puffy.
  2. Remove the baking sheet from the oven and immediately press one frozen chocolate kiss into the center of each cookie.
  3. Let the cookies sit on the sheet for about 5 minutes before transferring them to a wire rack to cool completely.

Notes

For extra drama, dust cooled cookies with powdered sugar. Cookies stay soft in an airtight container for 4 to 5 days. Freeze baked cookies for up to 2 months.

Similar Posts

  • Sweet and Simple Classic Cannoli Squares You’ll Love!

    Why You’ll Love It Key Ingredients in Cannoli Delight Helpful Swaps Pro Tips Storage Serving Suggestions Common Questions Give This No-Fuss Favorite a Try Classic Cannoli Squares always remind me of those moments when you want something sweet, but you also want to avoid a massive kitchen disaster. Like, honestly, who decided deep-frying was the…

  • Deliciously Easy Air Fryer Chocolate Crescent Rolls Recipe

    Air Fryer Chocolate Crescent Rolls are my secret for last minute dessert cravings that still feel special. If you love quick sweets that deliver big cozy vibes, you’re in the right kitchen. Think warm, flaky pastry with a melty chocolate middle and a hint of crunch on the edges. If that sounds like your kind…

  • Irresistible Warm Blueberry Dump Cake in Just One Bowl!

    blueberry dump cake is the answer to so many nights when you want something warm, cozy, and sweet without a sink full of dishes. I make this on repeat because it’s fast, forgiving, and tastes like a hug in a bowl. The top turns buttery and crisp, the blueberries bubble into a jammy layer, and the whole thing perfumes the kitchen with that summer pie smell. If you’re busy, short on energy, or just want a dessert that never lets you down, this is it. I call it my weeknight hero, and yes, it really is a one bowl situation. Meet my favorite: Irresistible Warm Blueberry Dump Cake in Just One Bowl! What Makes Blueberry Dump Cake So Good? Let’s be real. Some nights you want dessert, not a project. This dessert is simple in the best way: a fruit layer gets tossed in a single bowl, a cake mix goes on top, melted butter does the magic, and the oven finishes the rest. The result is a cross between cobbler and cake. It’s gooey at the bottom, crispy on top, and totally scoopable. No mixer. No multi-step frosting. No stress. Here’s what I love most about Irresistible Warm Blueberry Dump Cake in Just One Bowl!: minimal effort, big reward, and it’s perfect for last-minute company. It tastes like you worked all afternoon, even though you totally didn’t. What you need Easy one bowl method Grab one large bowl. Stir together the pie filling, blueberries, lemon zest, a squeeze of lemon juice, a teaspoon of vanilla, and a tiny pinch of salt. If your berries are very juicy, stir in a teaspoon of cornstarch to thicken the filling. Taste a little. If you want it sweeter, add a tablespoon of sugar. Pour that into a buttered baking dish. Sprinkle the dry cake mix evenly on top. Drizzle melted butter all over. Try to moisten as much of the mix as possible so there are fewer dry spots. That is it. Bake until the top is golden and the edges are bubbling like a little blueberry hot tub. Top tips from my kitchen: Keep it truly one bowl: melt the butter in a microwave safe cup, then use the same bowl you mixed the berries in to catch any drips or hold your spatula. Less cleanup, more dessert. Avoid dry patches: use a spoon to lightly tap the cake mix so it settles, then pour the butter in thin streams. If a few dry flecks remain, they’ll still taste good, but you can spritz with a tablespoon or two of milk. Serve warm: the texture is best about 15 minutes after baking, when it’s still bubbling and the top has set. Add a scoop of vanilla ice cream and it melts into a creamy sauce. Joy overload. “I made this for a last-minute backyard hangout and everyone asked for seconds. No one believed it started with a cake mix. The crispy top and jammy blueberries were perfect.” It’s simple, it’s cozy, and it’s very family friendly. The whole thing feels like that dessert you grew up with, only a little brighter and fresher. If you’re hosting, you can double the recipe and bake it in a big pan. If you’re solo, bake in two small dishes and freeze one for later. And yes, this still counts as a great holiday dessert. It holds its own on any table. Say it with me: Irresistible Warm Blueberry Dump Cake in Just One Bowl! Nutrition Facts (per serving) Let’s talk details so you can plan. This dessert is indulgent but not outrageous. Based on eight servings from a standard 9 by 13 pan, you’re looking at roughly 320 to 380 calories per serving, about 12 to 16 grams of fat (thanks, butter), 50 to 60 grams of carbohydrates, and 2 to 3 grams of protein. Sugar lands around 30 to 40 grams, depending on your cake mix and whether you add extra sugar to the berries. Sodium varies by brand but usually sits between 250 and 400 milligrams per serving. Want to lighten it up a little? Try using a light butter alternative, reduce the butter by a couple of tablespoons, or choose a cake mix labeled lower sugar. You can also add a handful of oats under the cake mix for extra texture and fiber. I sometimes swap half the pie filling for extra fresh berries, which adds tartness and cuts sweetness a touch. All nutrition numbers are estimates. Always check your labels if you need precise info. Bottom line: this is a dessert to share and savor. Pair a smaller scoop with fresh berries or a dollop of Greek yogurt if you want something lighter than ice cream. Photos of Blueberry Dump Cake Here’s what you should look for when it’s done. The top will be golden brown, with small buttery craters and a few darker crisp edges. Along the sides you’ll see blueberry juices bubbling. The center should not look floury. If it still looks dry in spots, give it another 5 to 8 minutes and check again. How to know it is baked just right Lightly shake the pan. If the center flows like liquid, keep baking. If it just jiggles slightly and the top is crisp, you’re good. You can also peek with a spoon. The top should crackle a bit, and the fruit underneath should look thick and glossy, not watery. For serving, scoop straight from the pan. Show off the layers. Steam rising, blueberry gems, and that buttery cookie-like topping make this a total crowd pleaser in photos. A small scoop of vanilla, lemon, or even cheesecake ice cream looks pretty and adds a creamy contrast. If you want color, sprinkle a little lemon zest or a few fresh blueberries on top. And yes, the leftovers still photograph well the next day. Reheat gently until the top crisps again. I love that it looks rustic and homey every single time. That’s the heart of Irresistible Warm Blueberry Dump Cake in Just One Bowl! You’ll Also Love Once you’ve got the hang of this method, you can riff on it any way you like. The one bowl trick works with so many fruits, and using a cake mix keeps things breezy. A few reader favorite ideas: Want a seasonal spin on Irresistible Warm Blueberry Dump Cake in Just One Bowl!? Add a pinch of nutmeg in winter or a handful of fresh basil ribbons in summer. Trust me, that basil-blueberry combo is wild in the best way. If you try any of these, tell me which one steals the show at your table. I love seeing your tweaks and swaps, especially when a pantry rescue turns into a family favorite. Rate This Recipe Did you make it? I’d love to hear how it went. Drop a quick rating so others know what to expect. Your notes help someone decide if they should add lemon, skip the extra sugar, or serve it with ice cream. If you baked Irresistible Warm Blueberry Dump Cake in Just One Bowl!, leave a comment with your pan size, brand of cake mix, and any clever add-ins. Even small details like using salted vs unsalted butter can be super helpful. Pro tip: if you’re saving leftovers, let the pan cool, cover, and refrigerate for up to 3 days. Reheat at 350 degrees for 10 minutes to re-crisp the top. You can also reheat single scoops in the microwave at 50 percent power so the butter layer doesn’t over-melt. Common Questions Can I use only fresh blueberries without pie filling? Yes. Add an extra tablespoon of sugar and 1 to 2 teaspoons of cornstarch to help thicken the juices. The texture will be a bit less jammy but still delicious. What size pan is best? A 9 by 13 pan works great. If you prefer a thicker fruit layer, use a 9 by 9 square and add 5 to 10 minutes to the bake time. How do I avoid dry cake mix spots on top? Sprinkle the mix evenly, then drizzle melted butter in thin lines to cover as much as possible. If tiny dry areas remain, lightly spritz with milk or add a few extra teaspoons of melted butter. Can I make it ahead? You can mix the fruit layer ahead and refrigerate. Add the cake mix and butter just before baking so the topping stays crisp. Frozen vs fresh blueberries? Both work. With frozen, do not thaw and consider adding a teaspoon of cornstarch if they’re very icy. Bake It Tonight This dessert is simple, warm, and wildly comforting. You toss, you sprinkle, you drizzle, you bake. That’s the promise behind Irresistible Warm Blueberry Dump Cake in Just One Bowl! and it truly delivers. Keep a box of cake mix and a bag of blueberries on hand, and you’re never far from a cozy, crowd-pleasing treat. Make it once and you’ll probably start finding reasons to make it again, just saying. I hope you try it soon, scoop it warm, and enjoy every jammy bite. If you do, please rate and share how it went. Happy baking, friend.