Delicious Classic Cannoli Squares with creamy ricotta and a dusting of powdered sugar.

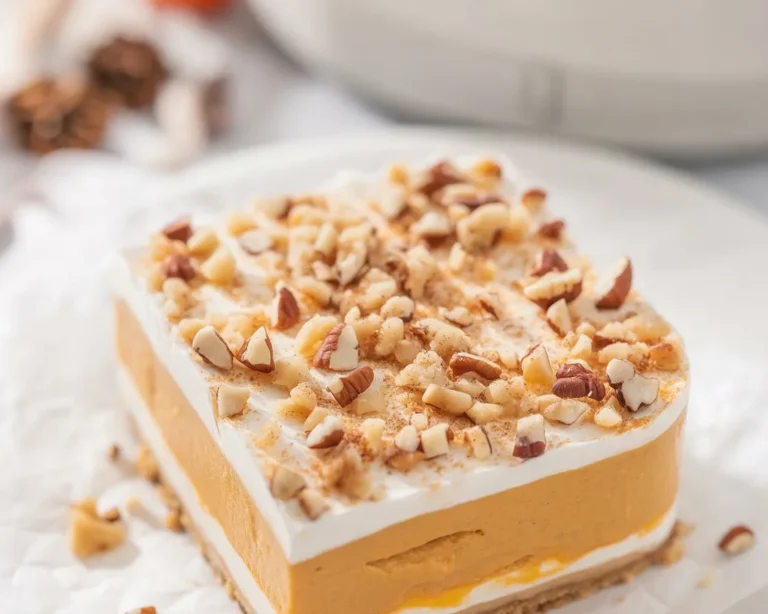
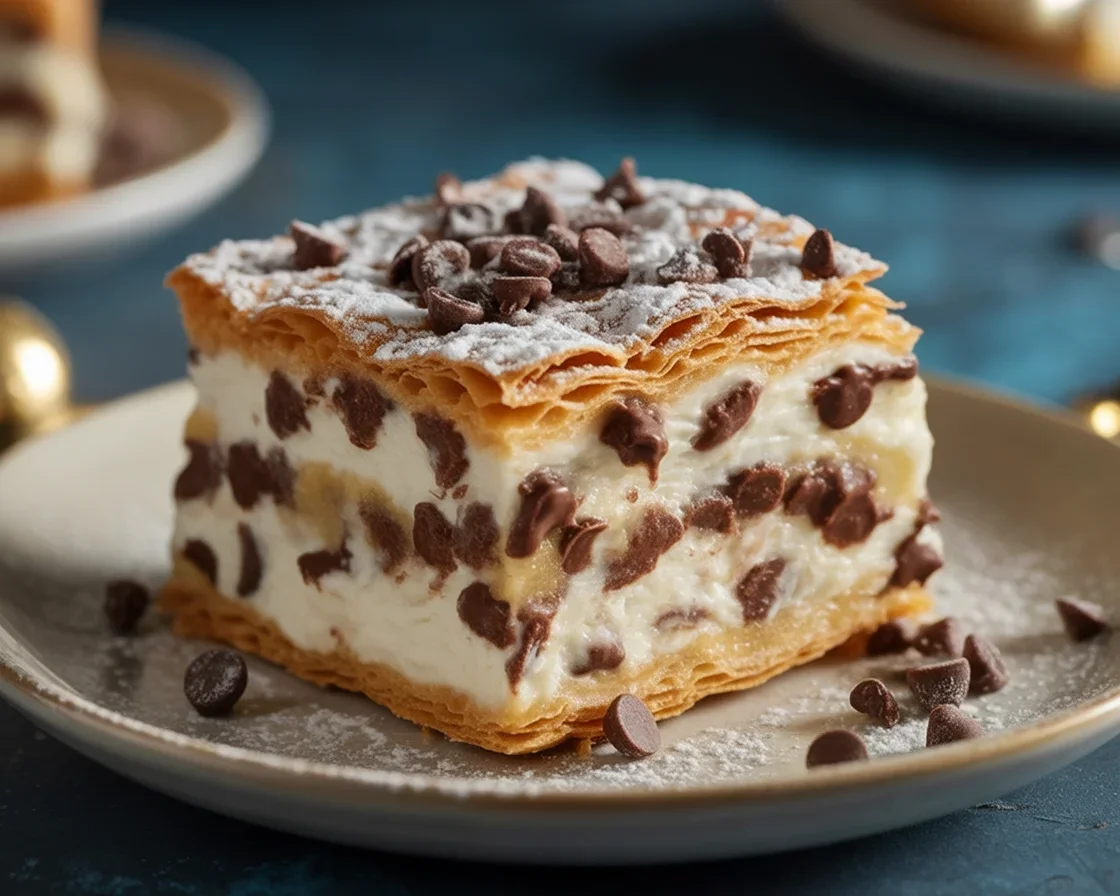
Sweet and Simple Classic Cannoli Squares You’ll Love!

Classic Cannoli Squares always remind me of those moments when you want something sweet, but you also want to avoid a massive kitchen disaster. Like, honestly, who decided deep-frying was the only way to get that iconic cannoli flavor? Sometimes you just want dessert, not an afternoon of cleanup. Anyway, I’m here to tell you—Boom!—you can absolutely enjoy all the best stuff from regular cannoli, but in an easy, tidy square form. Minimal mess, all the flavor, and yes, friends will be low-key obsessed.

Why You’ll Love Classic Cannoli Squares

If you’re anything like me, the idea of rolling and frying traditional cannoli shells brings instant stress (seriously, the mess!). Classic Cannoli Squares sidestep all that. You get crispy layers—thanks to simple shortcuts—and the same creamy, slightly tangy filling we all can’t stop eating. Plus, it’s way faster. I even made these while on a Zoom call once…risky, but it totally worked out.

They’re great for parties or—let’s be real—a Tuesday evening when you need a mood boost. The taste is so classic and yet just…ridiculously easy. Oh, and they transport well, so no shredded desserts in your lunch bag. Think of them as a cross between a lasagna and a five-star restaurant dessert platter. Nobody expects them to be this good, which is hilarious, because they are.

“Thought I’d miss the crunch of the original cannoli shell, but nope! These squares hit the spot. And they made me look like I had secret bakery skills.”
— Jenna, actual neighbor who devoured the test batch

Key Ingredients in Classic Cannoli Squares Delight

Okay, full honesty—this isn’t laborious ingredient hunting. You’ll probably have most things or at least not have to visit six specialty shops. The real deal-breakers are ricotta cheese, a bit of powdered sugar, mini chocolate chips (life-changing in every bite!), and a store-bought shortcut like graham crackers or puff pastry. Some folks get fancy with orange zest or a splash of almond extract, but it’s totally up to you. Oh, don’t skip the vanilla—seriously, use the good stuff if you can (makes all the difference for flavor that pops).

If you care about texture, try draining your ricotta a bit first. It seems extra but helps make the filling thick instead of runny. Creamy, lightly sweet, and dotted with chocolate—yes please. As for toppings, pistachios are classic, but hey, if all you’ve got is walnuts or even rainbow sprinkles? Get wild.

Helpful Swaps

Here’s my not-so-secret opinion: Classic Cannoli Squares Delight squares are basically the most flexible dessert ever. Don’t have ricotta? Use mascarpone! Forgot mini chocolate chips? Chop up a chocolate bar or swirl in Nutella. Even gluten-free graham crackers totally work. One time, I even tossed in some dried cranberries because I ran out of chocolate chips (kids were not mad).

If you’re dairy-free, try swapping the ricotta for a plant-based alternative and the whipped cream for coconut whip. Texture’s a little different, but honestly, still awesome. And if you want extra crunch? Layer with crushed waffle cones. Never rigid—always fun.

Pro Tips

These squarish treats are practically foolproof, but let me drop a few gems. Chill the filling before assembling, so it sets up nice and thick. That way, when you cut into your squares, you get neat layers (not oozy blobs). Dust with powdered sugar right before serving for that dreamy, bakery-style finish.

If you’re making these ahead, keep layering separate until a few hours before serving, or the “crust” can go soft. Got leftovers? They’re actually weirdly amazing for breakfast with coffee. Enthusiastically recommend.

Storage

Wanna keep your Classic Cannoli Squares fresh? Toss them in an airtight container and stash them in the fridge. They last about three days, maybe four if you resist snacking (which I never do).

Pro move: If you’re planning to serve later, wait to dust with powdered sugar until just before eating. Otherwise, it dissolves and looks kinda sad. If you accidentally forget? Meh, still delicious. You could even freeze the filling by itself, then quick-layer when you’re ready. That’s handy for surprise guests or late-night cravings.

Serving Suggestions

  • Serve these chilled, straight from the fridge. Super refreshing after a heavy dinner.
  • Sprinkle with extra mini chocolate chips or chopped pistachios right before serving.
  • Pair with a scoop of vanilla ice cream if you’re feeling wild.
  • Great with espresso or strong coffee for real-deal Italian vibes.

Common Questions

How do I keep Classic Cannoli Squares from turning soggy?
Keep the crust and filling separate until a few hours before you want to serve them. It helps keep everything crispy.

Can I make these ahead of time?
Absolutely. Just chill the filling in the fridge and assemble closer to serving. That keeps the crunch factor alive.

Do I have to use ricotta cheese?
Not a must. Mascarpone or a blend both work. Just make sure to drain any watery cheese for best results.

What can I use instead of chocolate chips?
Crushed cookies or even a dash of cinnamon work great. I’ve also tried chopped dried fruit for a twist.

Are these really kid-friendly?
Totally! Just skip the nuts if you’ve got picky eaters or allergy concerns.

Give This No-Fuss Favorite a Try

I keep coming back to Classic Cannoli Squares because, honestly, they’re equal parts fun and simple—like a shortcut to a five-star Italian bakery without ever leaving your kitchen. If you want another spin on this crowd-pleaser, check out the Cannoli Delight Recipe (Easy No-Bake) | The Kitchn or maybe get inspired by Cannoli Bars – Stir Taste Smile for even more ideas. You won’t believe how tasty this can be with so little work. Try these once, and you’ll wonder why you ever thought making regular cannoli was the only way. Give it a go—honestly, dessert doesn’t have to be complicated to be totally craveable.

Classic Cannoli Squares

Enjoy a simplified version of the classic cannoli dessert in an easy, tidy square form, featuring crispy layers and a creamy, slightly tangy filling.
Prep Time 20 minutes
Total Time 20 minutes
Servings: 9 squares
Course: Dessert, Party
Cuisine: American, Italian
Calories: 180

Ingredients
  

For the Filling
  • 15 oz ricotta cheese Make sure to drain it for thicker filling.
  • 1/2 cup powdered sugar You can adjust based on sweetness preference.
  • 1/2 cup mini chocolate chips Can substitute with chopped chocolate bar.
  • 1 teaspoon vanilla extract Use high-quality vanilla for better flavor.
For the Crust
  • 1 box graham crackers Can also use puff pastry as a shortcut.
For Garnishing
  • 1 cup chopped pistachios Great alternative toppings include walnuts or sprinkles.

Method
 

Preparation
  1. Drain the ricotta cheese to remove excess moisture.
  2. In a mixing bowl, combine ricotta, powdered sugar, mini chocolate chips, and vanilla extract. Mix until smooth.
  3. Chill the filling in the refrigerator while preparing the crust.
Assembling
  1. Layer the graham crackers in a square dish to form the base.
  2. Spread a layer of the ricotta mixture over the graham cracker base.
  3. Repeat the layers until you’ve used all the filling and crackers.
Serving
  1. Dust with powdered sugar before serving for a finishing touch.
  2. Serve chilled and enjoy with espresso or vanilla ice cream if desired.

Notes

To keep crusts from getting soggy, layer the filling and crust separately a few hours before serving. Store in an airtight container in the fridge for up to 4 days.

Similar Posts

  • Red Velvet Cake Mix Blossom Cookies You’ll Want to Bake Today

    Red Velvet Cake Mix Blossom Cookies saved me last holiday when I needed a dessert in under 30 minutes. You know those moments when you promised to bring something sweet, and time just sprinted away from you? Been there. These cookies are soft, chewy, and dressed up with a chocolate kiss in the center, which…

  • Deliciously Easy Air Fryer Chocolate Crescent Rolls Recipe

    Air Fryer Chocolate Crescent Rolls are my secret for last minute dessert cravings that still feel special. If you love quick sweets that deliver big cozy vibes, you’re in the right kitchen. Think warm, flaky pastry with a melty chocolate middle and a hint of crunch on the edges. If that sounds like your kind…

  • Irresistible Warm Blueberry Dump Cake in Just One Bowl!

    blueberry dump cake is the answer to so many nights when you want something warm, cozy, and sweet without a sink full of dishes. I make this on repeat because it’s fast, forgiving, and tastes like a hug in a bowl. The top turns buttery and crisp, the blueberries bubble into a jammy layer, and the whole thing perfumes the kitchen with that summer pie smell. If you’re busy, short on energy, or just want a dessert that never lets you down, this is it. I call it my weeknight hero, and yes, it really is a one bowl situation. Meet my favorite: Irresistible Warm Blueberry Dump Cake in Just One Bowl! What Makes Blueberry Dump Cake So Good? Let’s be real. Some nights you want dessert, not a project. This dessert is simple in the best way: a fruit layer gets tossed in a single bowl, a cake mix goes on top, melted butter does the magic, and the oven finishes the rest. The result is a cross between cobbler and cake. It’s gooey at the bottom, crispy on top, and totally scoopable. No mixer. No multi-step frosting. No stress. Here’s what I love most about Irresistible Warm Blueberry Dump Cake in Just One Bowl!: minimal effort, big reward, and it’s perfect for last-minute company. It tastes like you worked all afternoon, even though you totally didn’t. What you need Easy one bowl method Grab one large bowl. Stir together the pie filling, blueberries, lemon zest, a squeeze of lemon juice, a teaspoon of vanilla, and a tiny pinch of salt. If your berries are very juicy, stir in a teaspoon of cornstarch to thicken the filling. Taste a little. If you want it sweeter, add a tablespoon of sugar. Pour that into a buttered baking dish. Sprinkle the dry cake mix evenly on top. Drizzle melted butter all over. Try to moisten as much of the mix as possible so there are fewer dry spots. That is it. Bake until the top is golden and the edges are bubbling like a little blueberry hot tub. Top tips from my kitchen: Keep it truly one bowl: melt the butter in a microwave safe cup, then use the same bowl you mixed the berries in to catch any drips or hold your spatula. Less cleanup, more dessert. Avoid dry patches: use a spoon to lightly tap the cake mix so it settles, then pour the butter in thin streams. If a few dry flecks remain, they’ll still taste good, but you can spritz with a tablespoon or two of milk. Serve warm: the texture is best about 15 minutes after baking, when it’s still bubbling and the top has set. Add a scoop of vanilla ice cream and it melts into a creamy sauce. Joy overload. “I made this for a last-minute backyard hangout and everyone asked for seconds. No one believed it started with a cake mix. The crispy top and jammy blueberries were perfect.” It’s simple, it’s cozy, and it’s very family friendly. The whole thing feels like that dessert you grew up with, only a little brighter and fresher. If you’re hosting, you can double the recipe and bake it in a big pan. If you’re solo, bake in two small dishes and freeze one for later. And yes, this still counts as a great holiday dessert. It holds its own on any table. Say it with me: Irresistible Warm Blueberry Dump Cake in Just One Bowl! Nutrition Facts (per serving) Let’s talk details so you can plan. This dessert is indulgent but not outrageous. Based on eight servings from a standard 9 by 13 pan, you’re looking at roughly 320 to 380 calories per serving, about 12 to 16 grams of fat (thanks, butter), 50 to 60 grams of carbohydrates, and 2 to 3 grams of protein. Sugar lands around 30 to 40 grams, depending on your cake mix and whether you add extra sugar to the berries. Sodium varies by brand but usually sits between 250 and 400 milligrams per serving. Want to lighten it up a little? Try using a light butter alternative, reduce the butter by a couple of tablespoons, or choose a cake mix labeled lower sugar. You can also add a handful of oats under the cake mix for extra texture and fiber. I sometimes swap half the pie filling for extra fresh berries, which adds tartness and cuts sweetness a touch. All nutrition numbers are estimates. Always check your labels if you need precise info. Bottom line: this is a dessert to share and savor. Pair a smaller scoop with fresh berries or a dollop of Greek yogurt if you want something lighter than ice cream. Photos of Blueberry Dump Cake Here’s what you should look for when it’s done. The top will be golden brown, with small buttery craters and a few darker crisp edges. Along the sides you’ll see blueberry juices bubbling. The center should not look floury. If it still looks dry in spots, give it another 5 to 8 minutes and check again. How to know it is baked just right Lightly shake the pan. If the center flows like liquid, keep baking. If it just jiggles slightly and the top is crisp, you’re good. You can also peek with a spoon. The top should crackle a bit, and the fruit underneath should look thick and glossy, not watery. For serving, scoop straight from the pan. Show off the layers. Steam rising, blueberry gems, and that buttery cookie-like topping make this a total crowd pleaser in photos. A small scoop of vanilla, lemon, or even cheesecake ice cream looks pretty and adds a creamy contrast. If you want color, sprinkle a little lemon zest or a few fresh blueberries on top. And yes, the leftovers still photograph well the next day. Reheat gently until the top crisps again. I love that it looks rustic and homey every single time. That’s the heart of Irresistible Warm Blueberry Dump Cake in Just One Bowl! You’ll Also Love Once you’ve got the hang of this method, you can riff on it any way you like. The one bowl trick works with so many fruits, and using a cake mix keeps things breezy. A few reader favorite ideas: Want a seasonal spin on Irresistible Warm Blueberry Dump Cake in Just One Bowl!? Add a pinch of nutmeg in winter or a handful of fresh basil ribbons in summer. Trust me, that basil-blueberry combo is wild in the best way. If you try any of these, tell me which one steals the show at your table. I love seeing your tweaks and swaps, especially when a pantry rescue turns into a family favorite. Rate This Recipe Did you make it? I’d love to hear how it went. Drop a quick rating so others know what to expect. Your notes help someone decide if they should add lemon, skip the extra sugar, or serve it with ice cream. If you baked Irresistible Warm Blueberry Dump Cake in Just One Bowl!, leave a comment with your pan size, brand of cake mix, and any clever add-ins. Even small details like using salted vs unsalted butter can be super helpful. Pro tip: if you’re saving leftovers, let the pan cool, cover, and refrigerate for up to 3 days. Reheat at 350 degrees for 10 minutes to re-crisp the top. You can also reheat single scoops in the microwave at 50 percent power so the butter layer doesn’t over-melt. Common Questions Can I use only fresh blueberries without pie filling? Yes. Add an extra tablespoon of sugar and 1 to 2 teaspoons of cornstarch to help thicken the juices. The texture will be a bit less jammy but still delicious. What size pan is best? A 9 by 13 pan works great. If you prefer a thicker fruit layer, use a 9 by 9 square and add 5 to 10 minutes to the bake time. How do I avoid dry cake mix spots on top? Sprinkle the mix evenly, then drizzle melted butter in thin lines to cover as much as possible. If tiny dry areas remain, lightly spritz with milk or add a few extra teaspoons of melted butter. Can I make it ahead? You can mix the fruit layer ahead and refrigerate. Add the cake mix and butter just before baking so the topping stays crisp. Frozen vs fresh blueberries? Both work. With frozen, do not thaw and consider adding a teaspoon of cornstarch if they’re very icy. Bake It Tonight This dessert is simple, warm, and wildly comforting. You toss, you sprinkle, you drizzle, you bake. That’s the promise behind Irresistible Warm Blueberry Dump Cake in Just One Bowl! and it truly delivers. Keep a box of cake mix and a bag of blueberries on hand, and you’re never far from a cozy, crowd-pleasing treat. Make it once and you’ll probably start finding reasons to make it again, just saying. I hope you try it soon, scoop it warm, and enjoy every jammy bite. If you do, please rate and share how it went. Happy baking, friend.