Classic Crème Brûlée – Rich, Creamy & Easier Than You Think
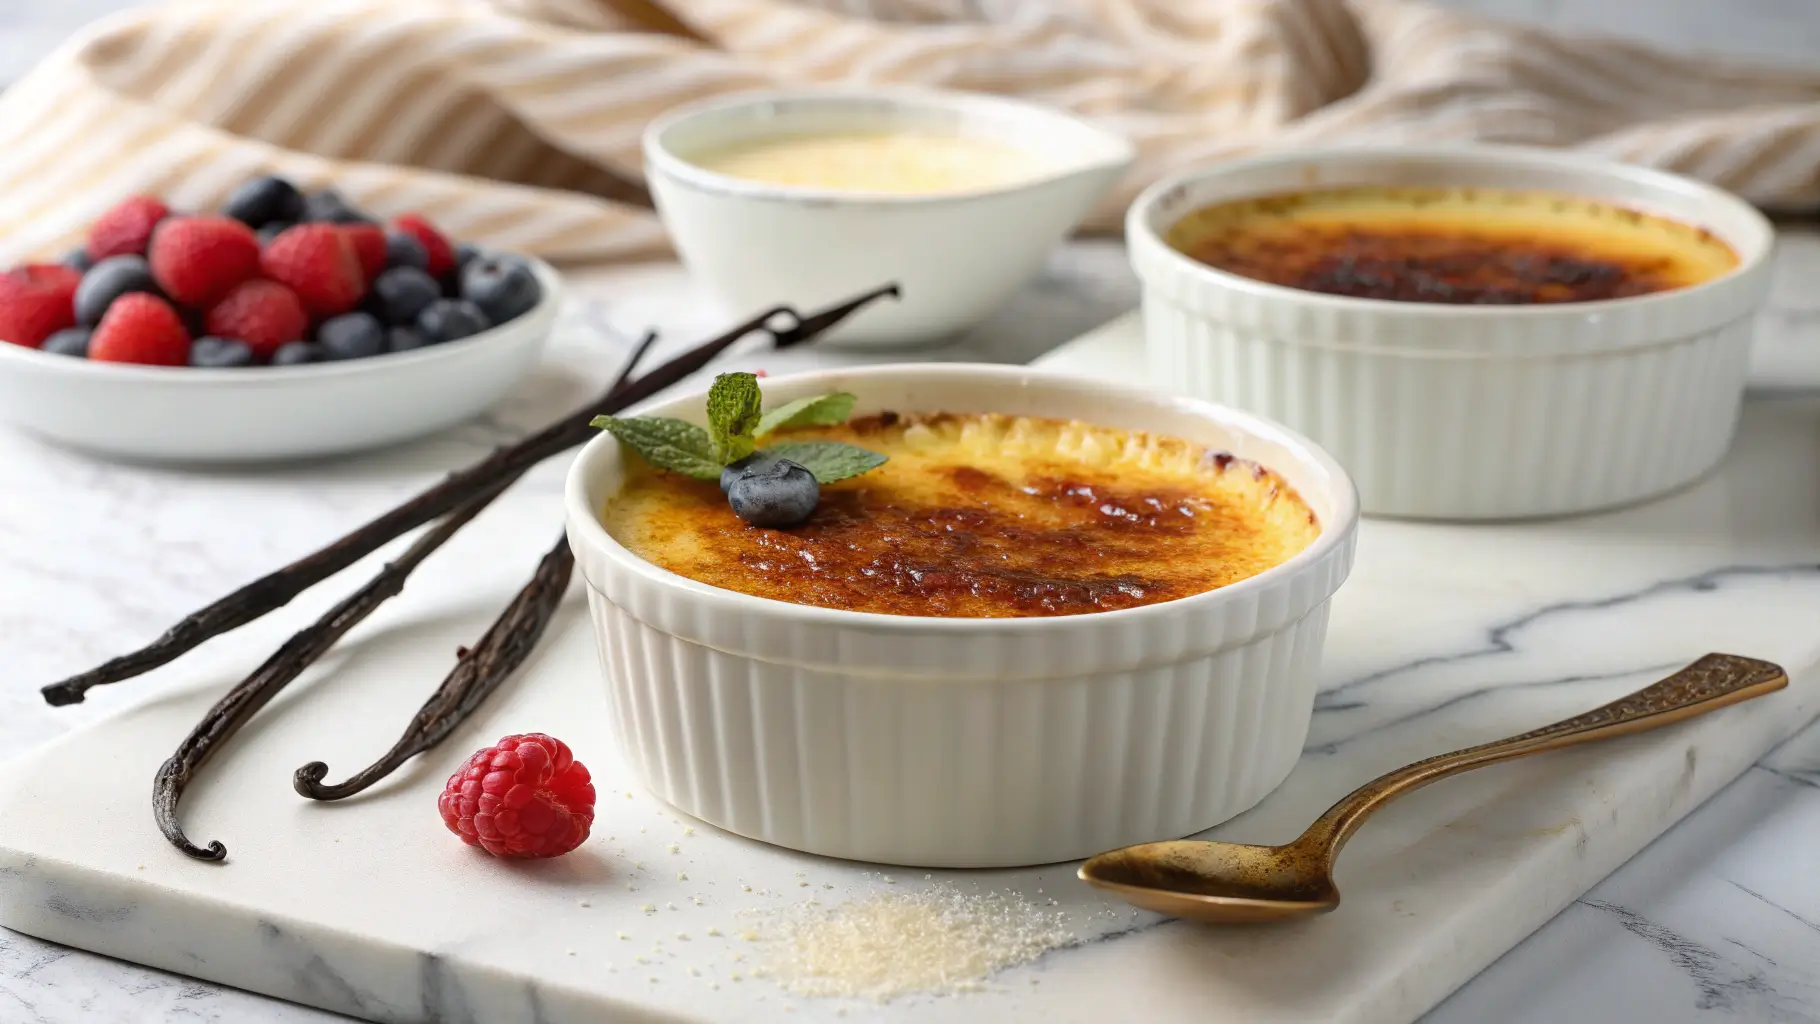
There’s something utterly magical about cracking through the glassy, caramelized sugar crust of a perfectly made crème brûlée. This classic French dessert features a silky-smooth vanilla custard base topped with a crisp, torched sugar layer that shatters with each spoonful. While crème brûlée may seem like an intimidating restaurant-only treat, making it at home is surprisingly straightforward. With just five simple ingredients and a little patience, you can create this elegant dessert that’s perfect for special occasions, romantic dinners, or whenever you want to impress your guests with a restaurant-quality finale.
The beauty of crème brûlée lies in its contrasting textures—the brittle caramelized top gives way to cool, velvety custard underneath. The rich vanilla flavor combined with the slight bitterness of burnt sugar creates an unforgettable taste experience that’s been captivating dessert lovers for centuries.
Why You’ll Love This Crème Brûlée Recipe
- Surprisingly Simple – Despite its fancy reputation, this recipe uses basic ingredients you likely already have
- Make-Ahead Friendly – Prepare the custards up to 3 days in advance and torch just before serving
- Impressive Presentation – Looks and tastes like something from a high-end restaurant
- Perfect Texture Every Time – The water bath method ensures silky-smooth results without curdling
- Customizable Flavor – Easy to infuse with different flavors like coffee, citrus, or liqueurs
Ingredients
For the Custard:
- 2 cups (480ml) heavy cream
- 1 vanilla bean (or 2 teaspoons pure vanilla extract)
- 5 large egg yolks
- ½ cup (100g) granulated sugar, divided
- Pinch of salt
For the Topping:
- 4-6 tablespoons granulated sugar (or superfine sugar for easier caramelization)
Optional Flavor Variations:
- 1 tablespoon coffee liqueur or Grand Marnier
- 1 teaspoon espresso powder
- Zest of 1 orange or lemon
How to Make Crème Brûlée
Step 1: Prepare Your Oven and Ramekins
Preheat your oven to 325°F (163°C). Place 4-6 shallow ramekins (6-ounce capacity works perfectly) in a large baking dish or roasting pan. Set aside while you prepare the custard mixture.
Step 2: Infuse the Cream
In a medium saucepan, pour the heavy cream. If using a vanilla bean, split it lengthwise with a sharp knife and scrape out the seeds. Add both the seeds and the pod to the cream. Heat over medium heat until the cream just begins to simmer around the edges—don’t let it boil. Remove from heat and let steep for 15 minutes to infuse the vanilla flavor. If using vanilla extract, you’ll add it later with the egg mixture.
Step 3: Mix the Egg Yolks and Sugar
While the cream infuses, whisk together the egg yolks, ¼ cup of sugar, and a pinch of salt in a medium bowl until the mixture becomes pale yellow and slightly thick, about 2 minutes. This step is crucial for achieving that signature creamy texture in your crème brûlée.
Step 4: Temper the Eggs
Remove the vanilla pod from the cream (if using). Slowly pour about ¼ cup of the warm cream into the egg mixture while whisking constantly. This tempering process prevents the eggs from scrambling. Gradually add the remaining cream, whisking continuously. If using vanilla extract, stir it in now. Strain the mixture through a fine-mesh sieve into a large measuring cup or bowl with a spout—this removes any cooked egg bits and ensures an ultra-smooth custard.
Step 5: Fill the Ramekins
Carefully pour the custard mixture into your prepared ramekins, dividing evenly. Fill them about ¾ full, leaving a little room at the top for the sugar crust later.
Step 6: Create a Water Bath
Place the baking dish with the ramekins in the oven, then carefully pour hot water into the pan until it reaches halfway up the sides of the ramekins. This water bath (bain-marie) ensures gentle, even cooking and prevents the custards from curdling or developing an eggy texture.
Step 7: Bake to Perfection
Bake for 35-45 minutes, depending on the depth of your ramekins. The crème brûlée is done when the edges are set but the center still jiggles slightly when you gently shake the pan—it should move like Jell-O, not liquid. The custard will continue to set as it cools. Be careful not to overbake, or you’ll lose that luxurious, creamy texture.
Step 8: Cool and Chill
Carefully remove the ramekins from the water bath and let them cool to room temperature on a wire rack, about 30 minutes. Once cooled, cover each ramekin with plastic wrap and refrigerate for at least 4 hours or overnight. The custards must be completely chilled before you add the sugar topping.
Step 9: Caramelize the Sugar
Just before serving, remove the crème brûlée from the refrigerator and blot any condensation from the surface with a paper towel. Sprinkle 1-2 teaspoons of granulated sugar evenly over each custard. Tilt and tap the ramekin to distribute the sugar in an even layer. Using a kitchen torch, hold the flame 2-3 inches from the surface and move it in circular motions until the sugar melts and caramelizes to a deep amber color. Let the sugar harden for a minute or two before serving—it should form a crisp, glassy shell that cracks beautifully under a spoon.
Alternative Method: If you don’t have a torch, place the sugared ramekins under a preheated broiler for 1-3 minutes, watching carefully to prevent burning. Keep the oven door slightly open and rotate if needed for even caramelization.
Recipe Tips & Variations
For the Best Texture:
- Use room temperature egg yolks for easier mixing and smoother custard
- Don’t skip straining the custard—it makes a significant difference in the final texture
- The jiggle test is your best friend; slightly underbaked is better than overbaked
Flavor Variations:
- Coffee Crème Brûlée: Add 2 tablespoons espresso powder to the warm cream
- Chocolate Crème Brûlée: Stir 4 ounces melted dark chocolate into the warm cream mixture
- Citrus Crème Brûlée: Add orange, lemon, or lime zest to the cream while infusing
- Lavender Crème Brûlée: Steep 1 tablespoon dried culinary lavender with the vanilla
Dietary Adaptations:
- Lower Sugar: Reduce the sugar in the custard to ⅓ cup; the caramelized top still provides plenty of sweetness
- Dairy-Free: Substitute coconut cream for heavy cream (use the thick cream from canned coconut milk)
Torching Tips:
- Superfine sugar caramelizes more evenly than regular granulated sugar
- Keep the torch moving to avoid burning spots
- Two thin layers of sugar work better than one thick layer
Serving Suggestions
Serve your crème brûlée immediately after caramelizing the sugar topping for the best textural contrast. The cold custard paired with the warm, crispy sugar creates an irresistible combination.
Garnish with fresh berries like raspberries or strawberries for a pop of color and a tart contrast to the rich custard. A small dollop of lightly sweetened whipped cream on the side adds an extra touch of elegance.
Pair with espresso, dessert wine like Sauternes, or champagne for a truly special occasion. For a beautiful presentation, serve on a small plate with a decorative cookie or tuile on the side.
Storage & Freezing Instructions
Refrigeration: The unbaked custards can be prepared and refrigerated up to 3 days in advance—just wait to add and caramelize the sugar topping until right before serving. Once torched, the sugar crust will begin to soften after about 30 minutes, so plan accordingly.
Room Temperature: Crème brûlée should not be left at room temperature for more than 2 hours due to the dairy and egg content.
Freezing: While technically possible, freezing isn’t recommended for crème brûlée as the custard texture can become slightly grainy when thawed. This dessert is best enjoyed fresh or refrigerated.
Reheating: There’s no need to reheat—crème brûlée is served chilled with a freshly caramelized topping.
Nutrition Information (Per Serving)
Based on 6 servings:
- Calories: 340
- Fat: 28g
- Carbohydrates: 20g
- Protein: 4g
- Sugar: 18g
Note: Nutrition information is approximate and will vary based on specific ingredients used.
Conclusion
Making crème brûlée at home is an incredibly rewarding experience that’s far easier than most people imagine. With its luxurious custard base and dramatic caramelized sugar crust, this classic French dessert never fails to impress. Whether you’re celebrating a special occasion or simply treating yourself to something extraordinary, this recipe delivers restaurant-quality results every single time.
The beauty of mastering this technique is that once you’ve got the basics down, you can experiment with countless flavor variations to make it your own. Don’t be intimidated by the torch—embrace it! That satisfying crack of the sugar crust is absolutely worth it.
I’d love to hear how your crème brûlée turns out! Leave a comment below with your results, share your favorite flavor variations, or let me know if you have any questions. If you enjoyed this recipe, please share it with fellow dessert lovers who appreciate the finer things in life.
Frequently Asked Questions (FAQs)
Can I make crème brûlée without a kitchen torch?
Yes! While a kitchen torch gives the best results and most control, you can caramelize the sugar under your oven’s broiler. Place the sugared ramekins on the top rack under a preheated broiler for 1-3 minutes, watching constantly. The key is keeping the custards cold while caramelizing quickly, so work fast and keep a close eye to prevent burning.
How do I know when the custard is perfectly baked?
The crème brûlée is ready when the edges are set but the center still jiggles like Jell-O when you gently shake the ramekin. It should not look liquidy or ripple like waves. The custard will continue to set as it cools, so slightly underbaked is better than overbaked. If you have an instant-read thermometer, the internal temperature should be around 170-175°F.
Can I make crème brûlée ahead of time?
Absolutely! This is one of the best make-ahead desserts. Prepare the custards up to 3 days in advance and keep them covered in the refrigerator. Only add and caramelize the sugar topping within 30 minutes of serving to maintain that signature crispy crust. This makes it perfect for dinner parties when you want to minimize last-minute preparation.
Why is my custard curdled or grainy?
Curdling usually happens when the eggs cook too quickly or at too high a temperature. Make sure to temper your eggs by adding the warm cream gradually while whisking constantly. The water bath is essential—it provides gentle, even heat that prevents curdling. Also ensure your oven isn’t too hot; 325°F is ideal. Overbaking can also cause a grainy texture, so watch for that gentle jiggle in the center.
Can I use a different type of sugar for the topping?
While granulated sugar works perfectly fine, superfine sugar (also called caster sugar) caramelizes more quickly and evenly, making it ideal for crème brûlée. You can also use turbinado or demerara sugar for a deeper, more complex caramel flavor, though these take slightly longer to melt. Avoid powdered sugar as it contains cornstarch and won’t caramelize properly.
What size ramekins should I use for crème brûlée?
Shallow, wide ramekins (4-6 ounces) are ideal because they maximize the ratio of caramelized sugar crust to custard—which is what makes crème brûlée so special. Deeper ramekins work too, but you’ll have more custard and less of that satisfying crackly top. The recipe yields 4-6 servings depending on your ramekin size; adjust baking time accordingly, with deeper ramekins requiring a few extra minutes.